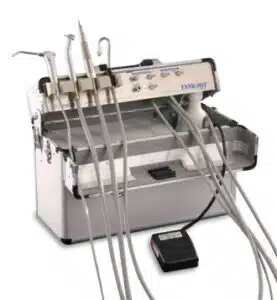
- Fully self-contained
- Easy to set up and operate
- 3-way air/water syringe
- Powerful saliva ejector suction
- Dual handpiece control with manual selection
- Compatible with Midwest 4-hole or Borden 2/3-hole pneumatic handpieces – specify when ordering
- Powerful internal oilless air compressor provides over 32 psi to handpieces and syringe
- 1 liter water reservoir
- Ample 32oz waste container
- Includes On/Off Footswitch
- Handpiece off-switch to run suction independently
- Water connection for external scalers
- All components pack into sturdy carrying case for easy transportation
- Integrated combination lock
- Dual voltage switchable
- Dimensions: 12.5”x 17.5”x 7.5” (31.8 x 44.5 x 19.1 cm)
- Weight: 28.5 lbs (12.8 kg)
- Manufactured in the USA
Aseptico Task Force Deluxe Dental Operating Unit Instructions
This self-contained dental operating unit runs on 110-120 Volts or 220-250 Volts by switching fuses and voltage selector insert. See instructions on manual and verify the voltage selector is correct before operating the unit.
This unit takes 1200-1500 watts of power to turn on and runs on 800 watts of power. Be sure to have at least a 14 gauge wire connecting the unit to a power source. Small diameter wires used for a light bulb do not carry enough current. Recommend using a 3 KW generator for 1-2 units and a 5 KW generator will run 5 units as they are never all on at the same time.
The unit is shipped and transported as checked luggage in a Sears rolling box which functions as a platform to place the unit on. The box and unit weigh 45 pounds allowing the addition of two boxes of gloves or other items in the case to meet the 50 pound airline weight limit.
It is helpful to place the unit behind the patient, so the assistant can easily reach the air-water syringe and suction, help switching the control between high and slow speed, and shut off the handpieces for suction only. Keep the handpieces on the dentist side and the hoses can go on either side of the patient’s head depending upon the dentist’s preference. Positioning the unit on the dentist’s side makes it difficult for the assistant to access the unit.
Follow the instructions in the manual to set up the unit.
The unit only operates when the foot control is activated. Be aware that depressing and releasing the foot switch within two seconds may cause the vacuum pump to stall and blow a fuse. After releasing the foot control, give it a second before pressing it again. The suction always functions, but turn the handpiece selection switch off when not using the handpiece, or the handpiece it will continue to function. It is advisable to place the handpieces with the bur end down for safety. Handpieces use a standard four hole connection. Only the high speed handpiece has water control.
Place bottled water or safe drinking water into the unit’s water bottle.
The saliva injector has an adaptor for attachment of a high volume tip. The suction is not the strongest, but is adequate if used properly. The plastic green tips work well for operative procedures and the white tips with a smaller opening work well for surgery. Both tips can be sterilized in the pressure pot and reused. When suctioning blood, be sure to run plenty of water through the hose during the procedure and after the procedure, as the blood will coagulate in the smaller hose and block the suction. A water container kept next to the unit for this purpose is helpful. Also, if suctioning chunks of restorative material or tooth, they may plug the line at the connection of the tip to the hose. It can easily be cleaned out by removing the rubber suction tip.
The waste container has an overflow stop, and will shut down the unit when it gets about two-thirds full. To empty the waste, use gloves and remove the two hose connections and take the bottle out with the top still screwed on. Take it to a toilet facility, unscrew the top, and dump it. Make sure the larger hose snaps all the way down to establish a good airlock or the unit will not function well.
The dental unit has a standard quick disconnect for a water line connection to an ultrasonic cavitron hygiene unit.
If using the unit continually in a hot environment, it can overheat and stop functioning. Give it (and yourself) a rest now and then.
To pack up the unit, run at least three cups of water through the suction hose to clean it out. Wipe down the unit with a disinfectant wipe. Dump the water and waste container and leave the hoses disconnected so the containers can dry out. Clean and place the foot switch next to the fluid containers. Take the power cord and place it next to the water containers. Make sure to not lose the clip which holds the unit lid, or the suction tip adapter. While holding the two handpiece hoses and air-water syringe hose together, figure eight them in the top of the lid which has the side latches and close the top (you can leave the handpieces on the hoses for transport). Take the detached suction hose with the adapter, placing it in the second folding lid. Close it and latch the lid. If not going on a plane, the Sears box can hold all the items around the operatory, while the dental operating unit is carried separately. When going on the plane, repack the unit in the Sears box for transport as a checked bag.

